Chrono Trigger - SNES Cartridge Repair
I recently saw a Chrono Trigger listed as non-working, spares and repairs.
The seller also provided an image of the cartridge showing a damaged connector shown below:

Everything pointed to the cartridge being legitimate but the the original asking price was too high for me to gamble on a possible repair. However, after contacting the seller directly we came to a reasonable price for me to take the risk of attempting to revive the cartridge.
A couple of days later I collect it from my local post office and get to check it out for myself:


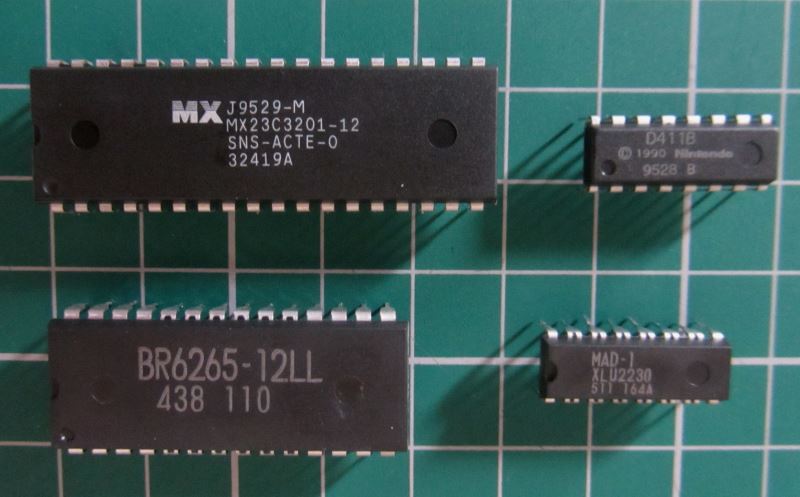
Good news is that it is indeed an original legitimate cartridge and all the chips appear intact.
However the cartridge connector as expected is heavily damaged and unfortunately there is also damage to several traces above the connector on the PCB:


I attempted to straighten the connector and then bridge all the breaks along all the pins on the cartridge connector with solder but even after doing that that it still felt too fragile and would require a fair amount of rewiring to fix the additional broken traces.
@khaz gave the great suggestion of:
Break it clean, glue it with epoxy, then repair the traces with some solder
However while this may have been stronger it would still require a messy internal rewire and with the damage going above the connector breaking it off would likely cause more damage to the PCB.
So I decided to instead remove all the chips from the game PCB to prepare for a transplant onto an identical donor PCB from a cheap Super Famicom game.
The removal of them was successful and painless. I would advise anyone attempting to do the same to add a little bit of new leaded solder to all the solder joints prior to using a solder sucker as it makes everything easier and the result much cleaner.
ROM: Chrono Trigger (NTSC/U)
CIC: D411B (USA)
Memory Mapper: MAD-1
SRAM: 64k
So now I needed to find a cheap donor game with an identical SHVC-1J3M-20 PCB.
I used Snes Central which is a great resource for SNES PCB scans and found out that the following games would be suitable:
I opted to go for a Japanese Chrono Trigger:

But unfortunately I ended up with an undocumented 2 ROM SHVC-BJ3M-20 version of the PCB:

So now knowing it would be a lottery trying to purchase another Japanese Super Famicom Chrono Trigger, I instead opted to do a little bit more research and I ended up getting a Dragon Quest VI cartridge which indeed had the identical SHVC-1J3M-20 I was after:
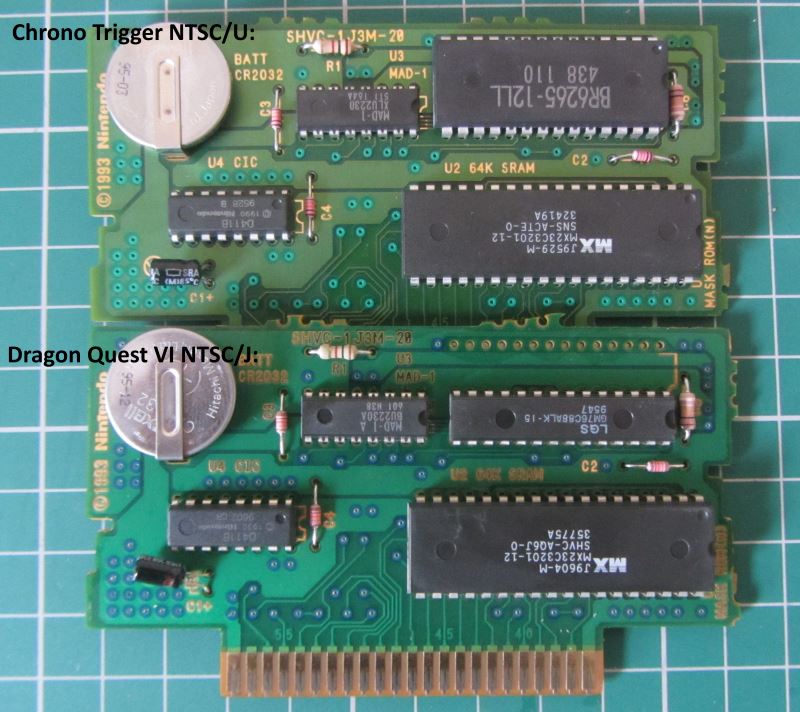
I initially only de-soldered the ROM and MAD-1 A chips from the Dragon Quest VI cartridge and replaced them with the Chrono Trigger NTSC/U and MAD-1 chips which was the bare minimum I was required to be able to test if they worked (they did), but I then also replaced the CIC and SRAM with the original ones from the Chrono Trigger cartridge as well for the sake of authenticity.
Due to there being a half size 64k SRAM on the Dragon Quest VI donor board I had to also clear the solder from the top row of pin holes to be able to insert the original full sized SRAM chip from Chrono Trigger:

Then I bridged the left over and soon to be unused through holes as they were on the original PCB:

I then proceeded to finish up the transplant and replaced the battery with a brand new Panasonic tabbed CR2032 battery giving me the final result:


Time to re-test it on my SNES and an hour or so of playtime later:

I am very happy with the result!
Just for those curious I have not thrown away any of the Dragon Quest VI chips or its case for that matter. For now they have been stored away in my parts box. Having a known working CIC and 64K SRAM could prove very useful for future repairs.