These seem really handy for thicker cables. Thanks for the info and link!
1 Like
I’m trying to find it but I might have just gotten my wires crossed. I thought I read it introduced some issues in edge cases but I can’t find any mention of it.
Forget I said anything 
1 Like
No sweat! I’ll be sure to post about it when I get to it!
I’ve been stuck on a project and needed to do something to clear my head.
The other day when playing my SNES through my Framemeister I noticed that there was some ghosting that I hadn’t previously noticed.
This particular SNES mini was bought second hand from a guy who was thinning his collection. Because of this I had no idea who did the initial mod work. I just knew it could do RGB and had a small power-on LED installed.
I figured it was long over due to crack this thing open and take a look.
First thing I noticed is that there is no actual RGB board in here. This was just modded old-school.
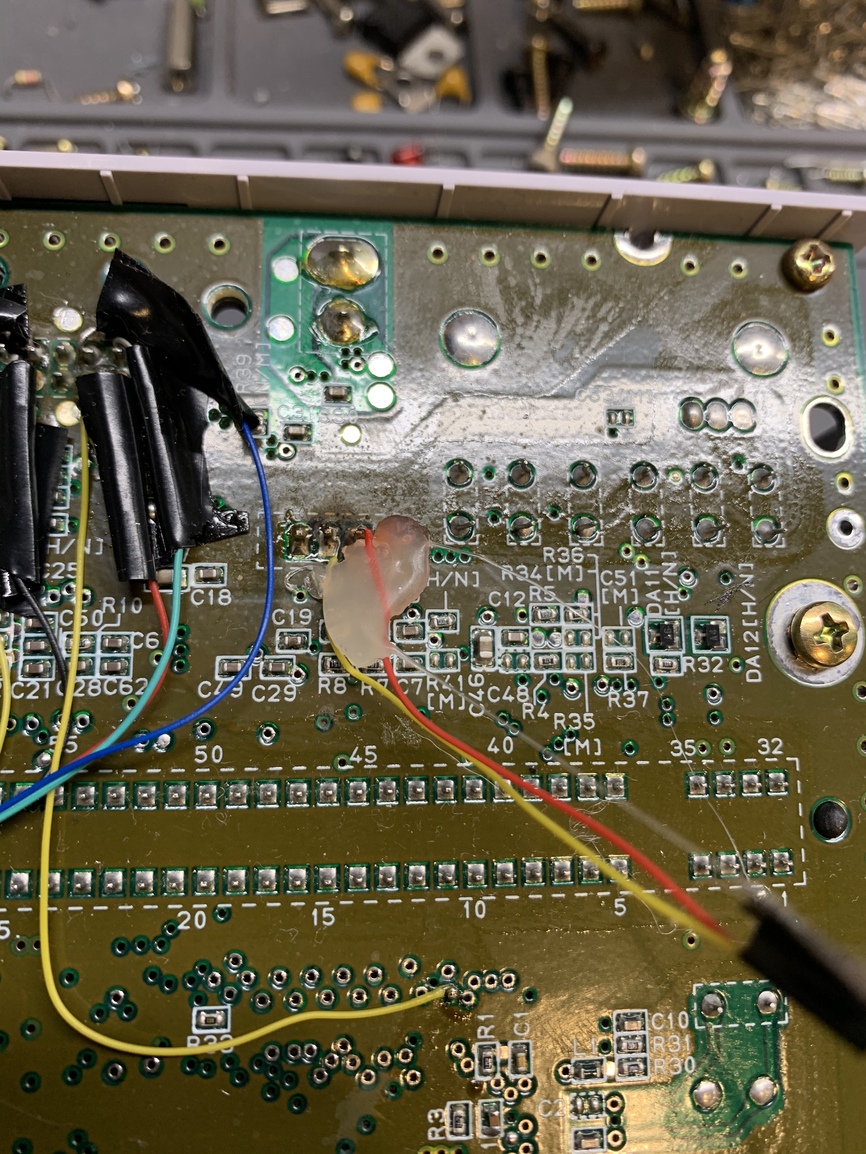
Hot glue everywhere!


I decided to de-bubba this thing and do the following.
-
Install a clean RGB bypass board.
-
Replace the 7805 power regulator with a 78S05.
-
Replace the C11 cap with a 470nf 0603 SMD cap to fix the ghosting that started me down this rabbit hole.
-
Recap the whole board.
First up was to peel out all the hot glue, desolate the caps and voltage regulator, and remove the old LED.

Here it is with a brand new regulator and caps.

Next up I installed Voultar’s RGB Bypass board and replaced the cap at C11.

Next I decided to install an RGB LED that cycles colors slowly. It had a blue LED in it before and I really associate that more with Sega.
This LED requires 3.2v and the 7805 spits out 5v. You could power it without a resistor but it will burn out faster.
To get the voltage down to the correct level I used a website called LEDcalc to determine the proper resistor to use. It’s really handy. Just plug in the source voltage and the desired voltage and it will tell you what resistor to use. In this case it was a 100ohm resistor.
I welded the 100ohm resistor directly to the LED’s positive leg.


Next I wired it up to the voltage regulator and added some heat-shrink tubing to keep it clean.


I don’t really use S-video but this board allows you to enable it so I figured why not go ahead and hook it up while I’m in here.


Lastly I needed to secure the LED in place in the upper shell.
Now. I’ve made it a point to never use hot glue in my mods but I just didn’t have a good way to secure the LED in place. So I figured when in Rome… After all it’s my personal console. It may not be the prettiest but it will get the job done. And hey, at least I didn’t slather the motherboard in it!


Then all that was left was to close it up and test it out!


After spending a little time with it tonight I decided that I’ll go ahead and install a 1000uf cap later to take care of the vertical stripe issue. I hoped the 78S05 would do it but it is still barely noticeable. I’m also going to enable the low pass filter to clean up the tiny bit of noticeable left over noise in the video signal When blown up 5x. None of that was noticeable on a CRT. Fun way to spend an evening and get my SNES into much better shape.
3 Likes
On my spare US SNES Mini I notice vertical stripe issues even on a CRT, though mostly just via FF3 at the intro screen that I never got around to looking into as well my main one I use never suffered from the issue.
What is this 1000uf Capacitor thing you mention?
1 Like
That mod work that was in there had to go! Nice work.
1 Like
The RGB bypass board gets rid of the vertical line completely and solves most of the ghosting issues of the 1chip systems. Replacing the c11 cap can fix the rest of the ghosting but still had issues a couple years back when I last looked into it.
1 Like
The Cap fix is listed over at RetroRGB.
Hey, thanks! It was long overdue. Feels good to know that the work in there is solid now.
Went ahead and completed the vertical line fix!
First up I prepared the motherboard by putting down a piece of double sided tape to secure the 1000uf cap.

Next I trimmed the legs on the cap, soldered wires, and put some heat-shrink on there to keep it clean.

Next step was to lay the cap down, trim the wires, and solder them to the 78S05.


Last thing I did was enable the low pass filter on the bypass board.

The opening to Final Fantasy is squeaky clean. Not a vertical band in sight!


Super Mario World, Mega Man X, and super Metroid are all perfect. No sign of interference now that the LPF is on.
Interestingly In some of the near-black gray values in FF3 I’m still seeing a bit of interference. This is very noticeable in castle Figaro. I’m beginning to think that it may be a PSU issue. So far I’ve only noticed it in one game. I may try to fix up the PSU or just replace it with a nice Triad supply. Either way I’m very happy with how this came out! Looks incredible at 5x on my OLED.
1 Like
I recently learned how to rip my own roms using the INL dumper. I’d been wanting to learn how to do it for a while so I could patch some Famicom games to English and play them hardware style. It actually wasn’t as difficult to do as I’d imagined.
I basically followed along with the Voultar video and it worked! The hardest part was learning how to use the command line stuff for the dumper.
First thing I did was rip Radia Senki.


Then I patched it to English using an IPS utility called Lunar IPS.

It worked!
Now to get it back onto the cart…
I decided to use Voultar’s 8-bitter method. It’s a little spendy to do it this way but it’s a much more elegant solution than burning EPROMs that would need to be rewired.
First thing was to split the PRG and CHR Roms and pad them using Famirom. Then I flashed the chips using the Flashcat programmer.


The chips look identical so I simply marked a sheet of paper with prog and chr and placed the programmed chips there until I was ready for them.

Then I cracked the cart open using a clamp and pulled the board.

Next I desoldered the appropriate legs on the original mask roms and lifted them out of circuit. I didn’t cut them in case I ever want to revert the cartridge to it’s original state. Then I tied the lifted legs high.

With that out of the way it was time to install the 8-bitter boards and solder the appropriate jumpers.

Next up was the tricky part. Installing the tiny TSOP48 chips. The trick here was to put down the chip and move it to the correct position first. Then I tacked it down on one side and then soldered all the pins on the opposite side by drag soldering and using a ton of flux. A little solder goes a long way here. After that side was fully soldered I did the same thing to the other side.

I decided to replace the old battery and put on a coin battery holder. This is a little tricky to do. It’s important to move the whole thing back as far as you can to make sure it will all fit in the shell.

It took me a couple of tries but I finally got it into the correct position and installed the battery.

Now to test it out…

It’s alive!


I Put the PCB back in its shell and started my adventure!


It’s awesome to be able to play this game authentically on its original cart and be able to really appreciate it because of the translation.
I’m looking forward to patching a handful more soon!
8 Likes
Amazing work!
1 Like
Thats awesome, I’d love to get my Portopia and Lagrange Point carts switched to English. I wonder if those are any more difficult since they have different mapper chips in them.
1 Like
Amazing work!
Thanks!
Thats awesome, I’d love to get my Portopia and Lagrange Point carts switched to English. I wonder if those are any more difficult since they have different mapper chips in them.
Interestingly all the “tall” Konami carts use standard eproms. They’re actually easier and cheaper to switch. You just desolder the old chips and pop in brand new ones. This makes it incredibly easy to switch back and forth if you ever wanted to.
Both of those games have English patches. I’d be happy to do those conversions for you if you want them done. Just let me know!
The issue right now is that the INL Retro dumper isn’t terribly well supported when it comes to Famicom mappers. None of the VRC mappers are available yet and there are other outliers like Holy Diver that uses a custom one-off mapper that aren’t supported.
That’s actually why I ended up buying a Copynes.
So, new project there and new software to learn but I enjoy that stuff.
I’m looking forward to translating my copies of Lagrange Point, Madara, Esper Dream 2, Amrmadillo, Samurai Pizza Cats, and Hopefully Banana prince. I also have copies of Mother and Sweet Home on the way as well!
3 Likes
Great work as always @Danexmurder.
Such a shame the 8-bitter boards need you to pull out pins to work and that they are not cost effective at all if you need to ship them outside of the USA like a lot of stuff to be fair.
I’m happy to just use a flash cart for the most part to play translations thankfully.
I really hate opening up Famicom Carts though… Even with clamp grips they are a pain to open up and there really is a special “knack” to opening them up that I haven’t quite gotten the hang of yet.
I also gave up on battery holders for cartridges with battery backup functionality.
The one you used above I found to be quite fragile along its solder tabs and an accidental drop can let the battery pop out. But seems like there is no other better option coin battery holder wise that will fit flush inside the cartridge shell.
1 Like
Thanks!
You know strangely, I’ve never picked up a flash cart. My first one ever is on the way. I grabbed a Hyperflash 32 for the Virtual Boy.
Yeah, opening Fami Carts is nerve wracking. I started doing it to clean the PCBs more thoroughly and got the hang of it. The tall Konami carts are a little scary though as they have 4 tabs inside instead of 2. In general though I’ve found that using the clamp on the bottom and squeezing a little at a time and using your fingers to finally pop them all the way open works well.
And yeah, those battery holders aren’t very robust. They work but I broke two learning how to put one in. I may open my cart back up and use some kapton tape to double-secure that battery in place.
It isn’t the most cost effective method in the world but so far it is the cleanest. In general it’s about $24 in hardware per cart not including the investment in an eprom flasher and a rom dumper.
That said it IS a really fun project to do and very satisfying when it works and you see it on screen!
1 Like
What?! didn’t know there was a new flash cart for Virtual Boy. I actually have one that allows you to flash one game at a time onto it. It was expensive too.
That ink function is innovative and takes things to the next level. I’d love to see other flash carts have the same functionality.
1 Like
I know! Super cool right? That’s why it’s my first one. Really innovative.
In case anyone wants to check it out.

Looking forward to getting to put it through it’s paces.
Since you’re handy with an iron, it might be better just to solder in a new one with the built in legs each time… considering you only have to do it once every 30 years!
1 Like
Yep, I think I’m going to go that route in the future.
Very, very cool stuff @Danexmurder! Your offer to do some translated carts is tempting! (I am still thinking about that GB mod I PM’d you about…)
1 Like