I’m happy to do both for you! There are still some Fami games that I can’t rip at the moment. Once I get my CopyNes installed I should be able to rip everything. If you want it done sooner than later let me know the game and I can look up the memory mapper it uses and let you know if I can rip it or not.
1 Like
Sweet Home translation complete!

It took me a minute to figure out what was going on with my Rip. When I first pulled it it looked like this.

Finally got it pulled properly though.

Turns out that I accidentally put an 8 for the CHR rom when it should have been zero. This game uses CHR ram.
The result of this is that you only have to install the PRG rom.


Once I got that sorted it was a hop skip and a jump to get the patched rom back onto the cart. This game is great! Finally getting to play it after all these years.

4 Likes
Cute dog
1 Like
That’s Petra. She’s a real sweetheart. She comes to visit me down in my shop when I’m wrenching on stuff. (Big deal because she used to be afraid of the stairs.  )
)
3 Likes
I recently wrapped up an NES RGB mod for @gamingdoyle It had been a while since I had done one and I have a lot more experience under my belt now. It was a lot of fun to see how I had improved in technique, tools and materials. Plus I just love getting to hot rod my favorite console.
I set this up to do RGB, S-Video, and original PPU composite video from the multi-out. I also installed an expansion audio board and did a full recap.


RGB Palette test:

Original PPU composite video from multi-out:

Expansion audio test:

I really love doing these. Hope I get a chance to do more soon!
3 Likes
I’ve been enjoying using my INLRetto dumper but have been somewhat disillusioned with the lack of support for Famicom mappers. So I decided to pull the trigger on a CopyNES from RetroUSB.
I installed the CopyNES and did the expansion audio mod to an extra NES I had lying around. This was actually way easier to get set up and working than I as expecting. The hardest part was pulling the CPU and that’s no problem with a solder vacuum.

I didn’t have a 47k ohm resistor lying around to put between pin three and nine on the expansion port so I made one! Using what I had on hand I daisy chained four 10k ohm resistors, four 150 ohm resistors, and a 100ohm resistor together.
It isn’t pretty but it gets the job done.


Then I cut a USB port and put it back together to test.


I’m happy to report that it works great! I’ll do a post about how it works in the ripping thread soon.

This was a fun one! I’m stoked to get ripping and translating more Fami games as well as backing up my NES collection.
2 Likes
Never heard of this CopyNES before!
It is a shame it appears you probably can’t have a NES RGB mod done at the same time using this though.
1 Like
I made a video documenting how to convert Lagrange Point to English! I had a lot of fun with this one. I’m finding that I really enjoy putting these YouTube videos together too. I would sure appreciate any feedback that you have and I’d love to hear ideas for anything you may want to see me cover!

Here’s a link to my first video covering rom dumping with the CopyNES.

1 Like
I hate to admit that when I started cleaning and dumping my Famicom games I had a casualty. When opening up my copy of Yume Penguin Monogatari I broke the case.

I was also surprised to see that the roms on the board were tiny and epoxied on!

I dumped the game but my plans to patch it to English seemed scuttled. A short time latter the thought to make a reproduction occurred to me and I stumbled across Muramasa Entertainment’s website. They have tons of gear for making repros and they had just what I needed.

I grabbed the parts I needed, flashed the roms and got to work.

In the future I plan to do a detailed video of the process but here’s what it looked like all put together.

I tried to put the PCB in the case and realized that the caps prevented the shell from closing around it. There’s more room in the front of the case so I moved the caps to the back of the PCB and closed it up.


I was stoked that it fired up on the first try!

What a cool quirky game.


I posted a short video about it too!

2 Likes
Another great video.
I’ve not played this game before but it looks rather good fun.
Whenever I get around to making a order from Japan again I’ll see about including it.
Have you thought about holding the original cart above a kettle to let the steam de-bond the labels glue so it can be removed cleanly? I have done this in thew past and had some success, though maybe a really low heat seating on a hot air station blowing on the inside of the cartridge would do a better job?
I should do this on some Japanese Mega Drive cartridges as I have quite a few that really should have their batteries replaced but I also don’t want to have to damage the label that covers the screw holes on the rear of those…
1 Like
If it’s possible (and I imagine it’s not) someone really needs to make a game genie-like physical device that you can use to patch a game on the fly that sits between the original Japanese game and the console so no physical modification is necessary.
Im sure it would impossible though. I imagine these patches are pretty significant software mods to the game code that wouldn’t be possible to edit on the fly.
3 Likes
Hmm.
Maybe you could use a pass through cart in a way like Sonic & Knuckles does.
Though would need someone clever to figure out if it would be possible to bypass the ROM in the cart while still using everything else (Mappers/Battery/SRAM) from the original cart.
1 Like
That’s definitely the great thing about going the Repro route. You never have to open the case. You just dump the roms, patch it, burn it, and put the board together like I did here.
But yeah, some sort of on the fly cartridge patcher would be awesome.
Just watched the video. What a premise for a video game. Easy to see why diet pills as a premise got in the way of marketing this one to kids in the west.
Still, it looks fun
1 Like
Oh yeah, it’s no wonder they didn’t localize this one. It’s a great game though. I love that it has platforming and shmup levels. Thanks for watching! Always keen to hear feedback or what people would like to see.
New video up! I decided to switch gears a bit and cover some arcade hardware stuff.

4 Likes
Cool video.
1 Like
Thanks @Peltz !
Just wrapped up a refurb on an NES for a coworker. Full recap and I threw in an expansion audio mod for fun. The shell looks way better after a thorough cleaning and a few passes with the Novus 1/2/3.


I posted a video of the work while I was doing it.

It’s a long one but it was fun to put together.
Plenty more to knock out soon from this lot. I got an SNES that had a missing power connector up and running with a donor part. Having fun chipping away at it.
4 Likes
Wrapped up another Fami translation! This time I decided to do Mother. After digging around a bit I decided to go with the 25th anniversary edition hack. I’ve been wanting to play this game for years. Time to get into it!


After cracking it open I set the PCB aside and burned the freshly translated roms.

After that I prepped my board and cut the appropriate pins. After doing a handful of these I think it is actually less invasive to cut a leg than to desolder it and pull it up through the PCB. It’s way easier to damage a trace or snap a leg off doing it that way. It’s incredibly easy to reverse a clean flush cut. Just bend the leg back down and solder into place.


I then removed the CR2032 save battery and replaced it with a new holder.

I then bridged the appropriate pins on the original roms.


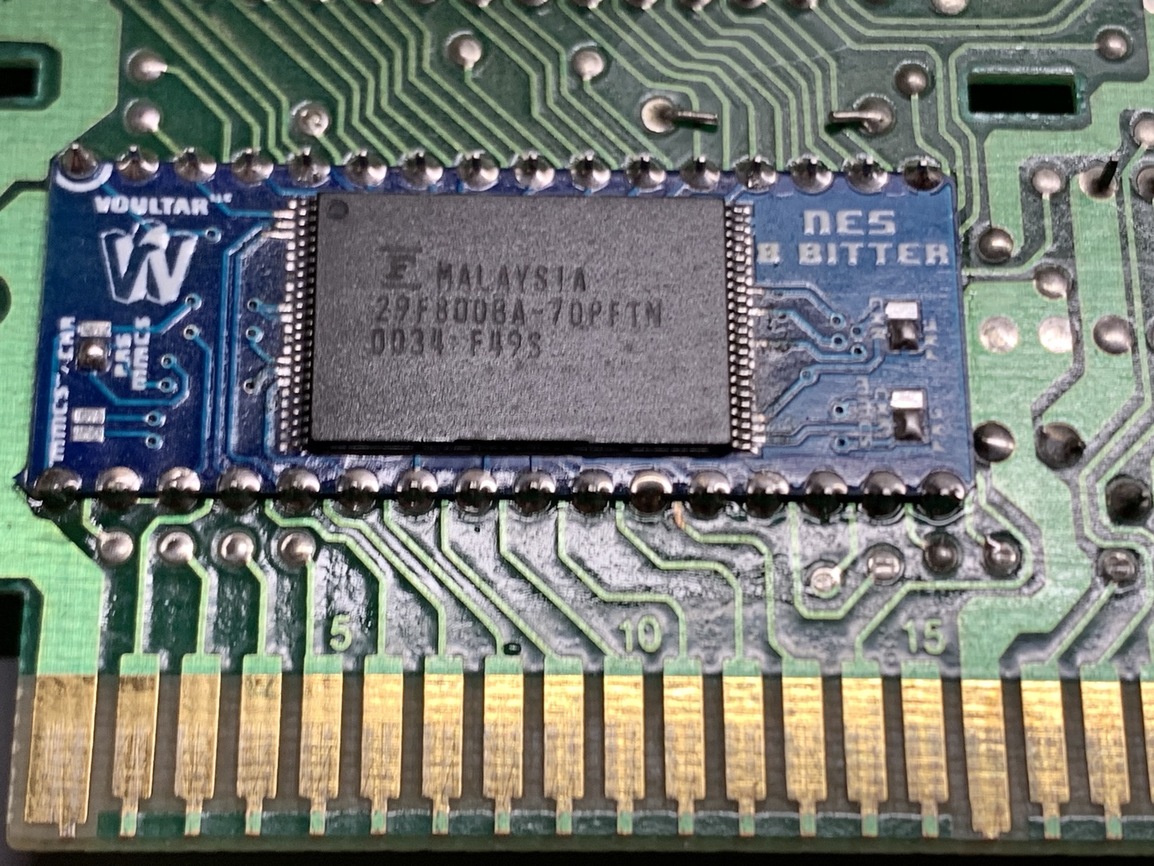
Next up I soldered the 8-Bitter PCBs into place and tacked down my first rom. In the future I may start adding the TSOP-48 roms to the 8-bitter boards before welding them into place.

It’s incredibly important that once you get your TSOP-48 propery aligned you tack it down and then double check that everything is lined up exactly. This is pretty fine pitch soldering and it’s easy to bridge a pin here. This part isn’t hard you just have to be patient, work slow, and use tons of flux, and double check your work. Then triple check it.


Now it’s time to plug that CR2032 into the holder and test it out!


Everything looks good. Now to button it back up.


I’ve really been enjoying doing these. I plan to do a couple more repros soon. In particular these RPG translations have been a lot of fun to do because I never played them on an emulator before. Getting to sit down with the cart to play for the first time is really special.
10 Likes