When your games go on the fritz - Suteneko's repair & mod thread.

Yeah, it is a native Xbox application.

But for the life of me I can not seem to find where I got it from originally.
I had intended to link to it in my repair log when I was writing it up.

If you are interested I have uploaded it to my webspace here: Xbox Controller Tool.

Just unzip the archive and ftp it over to you App folder on your Xbox!

It has lots of options and rather useful.

2 Likes

Amazing how quickly something can go from “trash” to brand new!

1 Like

Reminds me what I used to do with N64 Controllers.
I used to find the cables are totally trash, and I ened up replacing the cable with a USB cable with the ends snipped off, one end wired to the N64 PCB the other attached to the controller plug.

1 Like

Sony BVM 9045D Bad Colour (G2) Repair:

This is a fairly old repair from before when I started making repair logs but had already started taking photographs/video for reference. In the process of this write up I have had to open this BVM back up to get a few extra photographs and while it was opened up I decided to re-do the repair.

Back in 2017 I bought a 9" Sony BVM very cheaply on ebay, but unfortunately the state of the package when it arrived was horrendous.

Thankfully it powered on but the colours were all messed up:

If you tapped the casing, occasionally the correct colours would return but within moments they would revert back to being messed up.

I then found by opening up the monitor and pushing the neck board PCB ever so slightly back toward the rear I could get the colours to stabilize:

With how compact these smaller monitors are inside, they are rather fiddly to open:

To get access to the neck PCB I would first need to open up both sides:

Then unscrew and disconnect the rear panel:

On inspection of the rear of this PCB you can see that the G2 connection is damaged:

So I removed neck board from the CRT after disconnecting the flyback and a few connectors:

Taking a closer look at G2 (which is a connection from the flyback transformer) I could see that the pcb contact is damaged so I used solder wick to suck up the old solder to be able to evaluate the damage better:

The remains of the damaged trace contact:

Since it would not be viable to solder to the remains of the PCB trace contact I used a Fibreglass abrasive cleaning pencil to rub away the solder mask over the trace coming from G2:

Then soldered a large blob of solder onto this to secure the G2 wire to it:

I then re-assembled the BVM and everything now works correctly as it should:

5 Likes

Super cool! Working on my CRTs is the next part of this hobby that I need to explore.

1 Like

Really cool breakdown and it’s awesome you repaired it! skillz

2 Likes

Dreamcast 120v to 240v PSU Conversion Mod:

This is another old mod that is probably not so well known.

I bought a Japanese Va0 Dreamcast which of course is 120v so it needed a step down converter to run in the UK on our 240v mains electric supply:

I already had a step down converter, however it was problematic as even at over 1m away from my CRT it was still causing interference in a “wobble effect” for lack of better terms in the picture being displayed.

While I was searching for another solution I discovered there was a 120v PSU mod that had been posted on the darius-saturn forum in French.

So I decided to give it a try.

Here is the original 120v PSU:

But we are only concerned with this area of the PSU:

Here I removed the 200v 100µF capacitor at location C3 and the jumper with at position JP1:

Then on the rear of this area on the PCB there is a surface mounted resistor marked 124 (R13):

This also needs to be removed:

The removed components:

Now I needed to buy a single 400v 68µF capacitor and two 62Kohm 1/2W resistors:

We then solder in the 400v 68µF capacitor at location C3 and replace the jumper wire at location JP1 with one of the 62Kohm 1/2W resistors:

Then we need to solder in the other 62Kohm 1/2W resistor at location R13:

Now simply re-installed the PSU and powered up the Dreamcast:

I’ve been running my Dreamcast with this modded PSU for several years now on direct 240v mains, however the PSU does appear to run warmer than stock.

4 Likes

Super cool. I love reading about obscure mods like this. Great resource.

1 Like

Panasonic DMR-EZ48V DVD/VCR Combo Repair:

This is a little off topic for these forums but I hope some of you will find this interesting and potentially helpful for trouble shooting problems in other older electronic devices.

I bought this really lovely Panasonic VCR/DVD recorder combo unit about 7 years ago:

It has been powered on 24/7 for the entirety of that time, with it being used as my main method of watching VHS and DVD as I can output VHS and DVD content over component using it.

However recently I started to slowly notice I was getting some noise in the video which over the next few days got rather bad and was manifesting as horizontal noise lines in the video that sometimes would go bright orange along with a nasty hum in the audio.

I attempted to get at least one photograph of the issue but sadly this was the best I was able to manage as I really didn’t want to keep it powered up much longer:

I originally picked this up for £5 but now days they are apparently quite sort after (especially I suppose as they can record digital broadcast TV direct to VHS and output it easily to any CRT) and they are now selling for some serious money online.

I really wanted to save my unit so I decided to dismantle it to see if a repair would be possible.

Let’s start!

Taking the top off was rather simple, just remove a few screws and pull it off towards the rear:

Then you have to remove a single screw and unclip 5 clips to remove the front of the unit:

After removing 3 more screws you can flip the DVD drive over to the side:

Carefully pull out the 4 ribbon cables from the PCB underneath to allow you to remove the optical drive:

One more ribbon cable needs to be disconnected (the one that goes to the HDMI output) and after a few more screws are removed this PCB can also be pulled upwards to be removed:

This reveals the whole of the right hand side PCB, which the majority of which (upper right) is a switched mode power supply. Looking closer we can see some capacitors along the power rails are leaking:

I suspect this is the main culprit for the issues!

But first we need to remove this PCB and to do this we need to remove some screws from the rear of the unit that secure the input/outputs of the the machine:

Then very carefully I had to pry up these strange clips (one out of picture) that connect both main PCB:

After removing a few more screws and disconnecting the fan I could then remove the right PCB:

Since I had opened it up this far already I decided I would also check out the PCB to see if it also needed some refurbishment as this PCB controls the VCR and the main video/audio circuits.

The VCR unit was held in place by 5 screws which needed to be removed and the two ribbon cables for the video and audio heads needed to be disconnected at the motherboard before you can pull the whole thing upwards and off the motherboard:

Even more screws removed later and we are fully disassembled:

Sorry Johnny Five:

After removing the HDMI unit from the PSU/DVD motherboard PCB it is now ready for testing:

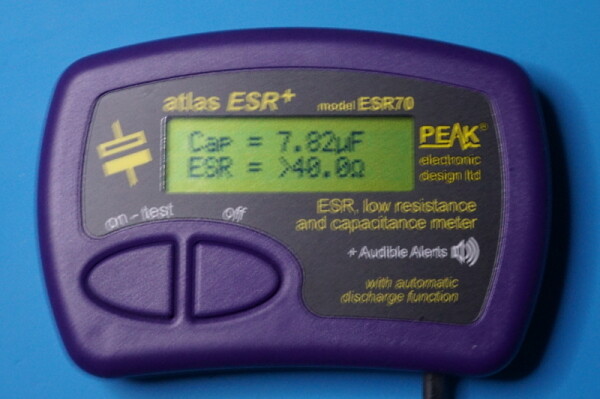
Using my ESR meter I started to test and compile a spread sheet of all the capacitors on this board while they are in circuit to give me a better idea of the situation.

Note:
Testing in circuit while in most cases will always give you the ESR reading for the capacitor.
However if the capacitors are in series with each other then you can end up with a combined ESR/Capacitance reading and it is common for you to not be able to get and capacitance reading due to nearby components.

Using some coloured ZEBRA marker pens I then marked the top of every capacitor to give me an easy visualization of where work needed to be done.

LEGEND:

  • RED = BAD
  • GREEN = GOOD
  • PURPLE = Can not fully check In-Circuit

From this it was easy to tell that the majority of the HOT and COLD sections of the PSU part of this PCB needed to be replaced. All the capacitors that could not be tested properly in circuit were removed and tested out of circuit and the results were conclusive that only the capacitors on the power rails needed replacing.

In total 15 capacitors were replaced:

Moving over to the left side VCR/AV PCB the same was repeated after un-slotting the small PCB on its left that does the decoding of video/audio streams.

Quite a few capacitors here were measuring with high but still just within acceptable tolerance ESR so I marked these with an ORANGE marker pen, but after checking some of them out of circuit I decided that the majority of them were fine and ended up only replacing 10 problematic reading capacitors:

These two PCB were then placed back into the housing:

Before dropping the VCR unit back onto the PCB we have to ensure that this cog is aligned correctly with the marking on the PCB:

We can then slowly start to re-assemble everything back together:

However, we are not quite finished yet.

I still have the slot in encoding board to check:

SHIT:

DSC07375e

All the SMD electrolytic capacitors on this are measuring with VERY BAD ESR…

I had never been able to get digital freeview TV broadcast to sync up with this so I could try to perform a firmware update, but I didn’t really ever care as I don’t watch TV and just assumed some incompatibility with the current broadcast system. But this leads me to believe that this was why!

So I needed to carefully use hot air to remove these SMD capacitors…

and replace them with new ones:

This was then slotted back into the unit so we are ready to test it and we appear to be working:

Here is all the removed and replaced capacitors:

I then tried to hook it up to an aerial and I was now able to do a firmware update check successfully:

All the noise is gone from the video and audio now:

For those interested here is the spreadsheet I created for this Panasonic DMR-EZ48V Recap Project.

Doing a full recap of this would have been cost prohibitive and wouldn’t have let me discover what exactly was problematic.

3 Likes

God dammit. Read through your entire post not prepared for the wave of nostalgia of seeing Outlaw Star. :c

2 Likes

Awesome write up as usual. The only VCR I tried to wrench on was a Sony pro deck and it was very much beyond my abilities at the time. That ESR meter looks like a handy piece of kit.

1 Like

What is your method for removing the small SMD capacitors on the encoding board? I need to do 8 just like that on my Macintosh Classic.

I was going to try this method, but I haven’t mustered up the courage to do it. Yet.

They only hot air I have is my wife’s hair dryer (very hot though!).

I’m happy to buy another tool, but I can’t buy a hot air station for one job.

1 Like

Using a hair dryer would be a huge mistake as you’ll end up throwing electrical charges that could fry your components.

I’ve used several different methods to remove SMD capacitors and not really found a good all around way to do it

Using hot air you can end up with the pads lifting up if their bonding is weak if you aren’t careful…

I wasn’t going to post this image but this happened to me using hot air:

The pads are only lifted and the traces are not broken so they can simply be re-bonded with a special heat resistant epoxy glue (something like CircuitWorks CW2500), however I don’t have any at the moment so I’ve set this board to the side and used and recapped a spare encoding board from a Junker Panasonic machine I obtained for free (Most the DMR models seem to use the same laser/HDMI & encoding board which is handy for spares).

I have repaired a MVS 2 slot Jamma connector using this epoxy glue method before, so all it is not lost when such things happens.

Using hot air can also end up warping your board is you aren’t able to preheat the whole board which lets face it none of us will have the equipment to do, but usually this won’t happen unless you are doing a lot of work on the board for extended periods with hot air.

The lightly twisting but not pulling up method does seem to work but is not really advised.
I have done this successfully though and as long as you are very careful and don’t use any force it should go okay. That said if you have any corrosion or electrolytic liquid on the pads there is a chance you will rip off the pad totally.

I’ve had disasters using both.

The best method seems to be using those SMD Tweezers such as the Hakko FX8804.

I really should think about investing in these now that my Hakko soldering station is supported by them!

I have neither soldering station nor tweezers.

I’m not in a rush to do it. Will think on it some more.

I will not use a hair dryer! :joy:

1 Like

Practicing capacitor removal!

Board is out of an old broken AV amp.

2 Likes

I tried removing some using just a fine conical tip last night and gently prying the SMD capacitors up while holding the pad down with the irons tip because I did not want to hook up the hot air station just to remove a couple and it seems to work okay but takes a bit of patience.

1 Like

Took a couple dozen off that board.

The 7 from the Macintosh are now removed.

Glad I practiced!

Need to have a sit down now.

2 Likes

I have a couple techniques for removing them. Usually I just heat one side and lift and then heat the other side and lift. They usually pop right off that way.

The other method is riskier but I didn’t have any issues using it on a Game Gear. I literally just put a little flat head screw driver underneath and popped one side off at a time. No heat. It’s easier to lift a pad doing that but I didn’t have that issue.

I shied away from both of those, but did read about them elsewhere. I took a heavy bias of the experiences others had working on the exact same Macintosh Classic board I had to deal with. I figured that was worthwhile.

On my practice PCB some caps pretty much popped off with minimal force from the pliers. Closing the pliers was almost enough to get them off! In the Mac, less so, but still easy.

1 Like

Caps replaced! Bought some flux core solder to make my life easier attaching the new SMD caps. I’d rate my work 7/10: slightly untidy soldering, see me after class.

  • Sound came back but Macintosh still wouldn’t boot.
  • Replaced the dead HDD with a SCSI2SD and it’s booting successfully. Huzzah!

Sorry for hijacking your thread. That’s it from me!

2 Likes