Playing with my [Custom] Joystick, more fun than games...

I had been thinking about making my own custom arcade stick ever since I got into arcade hardware with a CPS2 and MVS mid 2017 but didn’t actually start planning building one until November 2017. Skip forward over a year and I finally have my “almost” finished twin joystick I can use.

PART 1: STARTING OUT

My original intention was to build my own twin joystick casing out of some sort of wood and then also house a supergun including an arcade power supply inside of it and after checking through lots of differing joystick and button layouts I came the decision that I really liked the design of the Astro City 2 player layout and was going to aim for something as similar to that as possible.

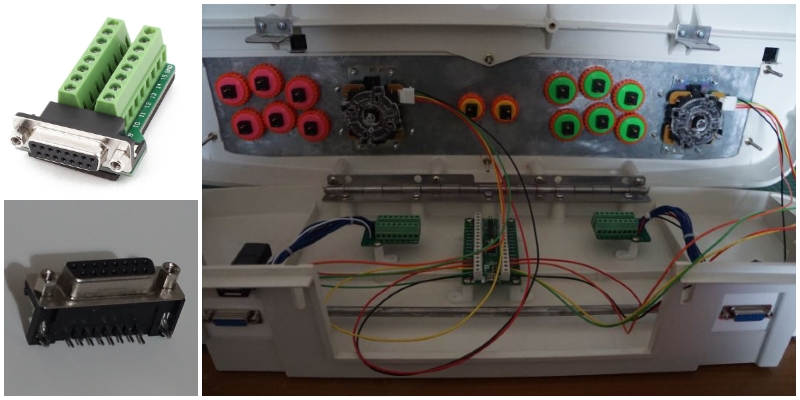
While I was doing more research I discovered that many arcade machines including the Astro City used a universal metal control panel that can still be easily bought new online and so I purchased one from Videotronics UK. I now needed a decal to place on top of it and found that the Arcade Art Shop made high quality reproduction vinyl decal that was perfect for my needs:

I now needed to buy the buttons and sticks and decided I would buy the following:

1 x Sanwa JLF-TP-8YT Ball Top Joystick (Green)
1 x Sanwa JLF-TP-8YT Ball Top Joystick (Pink)
6 x Sanwa OBSN-30 Screw In Arcade Button (Green)
6 x Sanwa OBSN-30 Screw In Arcade Button (Pink)
2 x Sanwa OBSN-24 Screw In Arcade Button (Yellow)

I then very carefully applied the vinyl decal to the control panel and cut out the holes ready for my Sanwa buttons and Joysticks to be installed into:

I had already made a few mock up boxes by cutting and scoring waste cardboard from work to try to figure out the measurements that I was going to use for the joysticks casing and used one of the smaller ones to see how it felt with the control panel installed in it after purchasing 8 x Joystick Carriage Bolts And Nuts:

I went through several different sizes of these mock up boxes and never really settled on a size that felt comfortable or how I was going to deal with the cabling and external connectors I would require, especially if I was still going to have an internal supergun and arcade PSU.

The biggest problem however was that I was starting to not want the end result to look amateur in anyway, which was not helped by my lack of faith in my wood working abilities and wanted the end result to look as professional as possible.

While looking around various resources online I discovered images of a few people who were actually just using the upper control panel housing from Japanese arcade cabinets with their supergun setups at home and I really liked this idea but now the challenge was would it be possible for me to do the same.

The uppers from various cabinets seemed to pop up occasionally on Yahoo Auctions but I wanted a complete housing with both and Upper and Under that would be suitable for my current control panel. So this limited me to Japanese cabinets of most which were made by SEGA. I managed to find and download service manuals for several of these machines that helped me find out the part numbers which in turn made my search results begin to be more fruitful.

For Blast City I was looking for part numbers: HOT1501 and HOT1506

Luckily after some weeks I found what I was looking for on ebay of all places from a Chinese seller Yaton6262 who appears to break down arcade machines for resale and does a lot of horrible conversions of arcade games.

I sent an offer to him for the Blast City Upper and Under Control housing he had listed, which he accepted!

Unfortunately the original listing is no longer accessible since this had been purchased way back in January 2018… I had hoped I could post up the original images from the ebay listing and at the time I didn’t think to take any of my own when it arrived. Thankfully I was able to save one of these images from browsing back in my discord discussion log with a friend:

While I already knew its condition wasn’t the best, it was going to require a hell of a lot of effort to restore it.

PART 2: RESTORATION

The first thing I did was fully disassemble it and deal with all the rusty metal parts.

Hammerite Rust Removal Gel was applied to all the metal parts with a brush and re-applied every 20 minutes or so until the rust was removed. A steel wool scrubbing pad with some WD40 was used to remove the gel and various small files were used in conjunction with linishing paper to deburr and smooth all the the edges:

The only drawback to this process is that the original protective plating also gets removed from the metal parts in this process. However this is much preferable to having the rust continue to eat away at the metal.

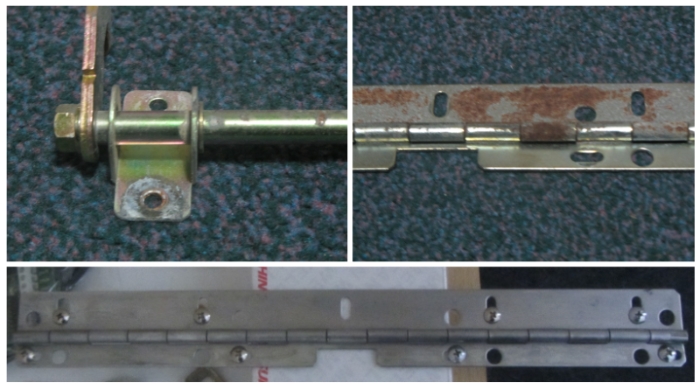
The actual screws and washers were not worth saving:

So using the Blast City service manual I found out exactly what sizes I required and replaced them all:

2 x Phillips Screw Pan Head M3 (Coin Slot)
2 x Flat Washer (Coin Slot)
2 x Spring Washer (Coin Slot)
8 x Phillips Screw Pan Head M4 (Latch & Lock Bracket)
8 x Flat Washer (Latch & Lock Bracket)
8 x Spring Washer (Latch & Lock Bracket)
8x Phillips Screw Truss Head M4 (Hinge)

Which ran to approximately 0.99p per pack.

Now I moved onto cleaning up the upper control housing which at some point was painted over so the first line of work was to remove all the paint. I coated the entire casing with Biostrip20 and allowed the paint to blister for an hour before using hot soapy water and a cheap plastic pry tool top scrape of the paint.

This had to be repeated several times until it was all removed.

Unfortunately as expected the plastic underneath the paint was in terrible condition and using typical Peroxide for whitening was not doing anything, so I had to resort to giving it a roughly 40% ratio Bleach to water bath with a small amount of very strong Cillit Bang power cleaner mixed in over several days and some arduous scrubbing.

To prevent the metal screw fixings that could not be removed from going rusty from excess contact to water they were all filled and covered with Blu-Tack.

Once I was happy with the results I finished it off by using Novus Plastic Polish grades 1-3 to help remove any minor scratches and bring the casing to a nice shine.

You can see the results below with the finished upper sat on top of the under housing for comparison:

This was all then repeated again on the Under Control Housing. The now free from rust metal hinges/latches and locking mechanism were re-assembled and my control panel was affixed:

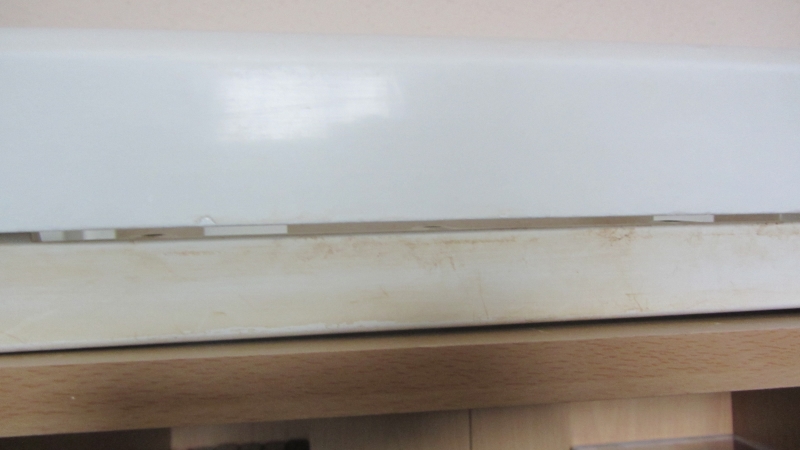
The coin slot cover that I had was badly damaged as you can see below:

CAS11

So I opted to buy a brand new one and found a Canadian Seller on ebay called leadtechgames2012 who still appears to be selling them.

The original Instruction and 100yen coin decals were cleaned with warm soapy water and replaced back into position along with the new coin slot cover:

I now needed to work on the glass instruction cover which needed the black paint surround touching up, the metal clips needed some minor rust removal/polish and the glass itself needed some light scratches removed.

As with the other metal fixtures I used the Hammerite Rust Removal Gel again. I then bought a tiny pot of black glass paint from a local hobby shop but found that even with multiple coats it just wasn’t working and couldn’t match the original black coating on the reverse of the glass.

Since I had some Rust-oleum Painter’s Touch black gloss craft enamel spray paint left from another project, I decided I would try using that instead. So I used black electrical tape to cover all the glass and metal around the edges of the black surround, then coated it liberally with the enamel spray paint and waited for it to dry before removing the electrical tape:

I then used fine grade Cerium Oxide powder mixed with hot water and gently with a microfiber cloth rubbed the glass in circles to help polish out the scratches. I then used grade 1 of my Novus Plastic Polish as it is a much lighter abrasive to bring the glass to a better shine polish before finishing it off with ordinary household polish with a duster:

All the restoration work on the Upper housing was now complete:

6 Likes

The idea of having an internal Supergun and power supply would mean the already heavy twin joystick would get a lot heavier and would also require that I would have to have way too many cables (Jamma Harness, Video, Audio & Power) trailing out from the rear and would have to be quite tightly packed inside to fit everything required inside so I decided to totally scrap that idea.

Instead I decided I would just use two standard DB15 Gameport panel mount female connectors and have a female USB port so I could also use this arcade stick with my PC in combination with an I-PAC 2 FS32 keyboard encoder.

But first I needed to finish cleaning up the rear of the Under housing which was partially damaged by a cut away and a drilled hole. There was also a huge opening where normally when mounted on a Blast City arcade cabinet would give you access to various cabinet controls that needed to be covered:

I used Superfine White Mulliput epoxy putty to fill in the damage. Then I bought a sheet of 3mm A4 White Perspex Acrylic Sheet Plastic from Plastics Online which I cut down into three pieces.

2 x 60mm (width) x 45mm (height)
1 x 290mm (width) x 95mm (height)

I then placed the two 60x45mm pieces of plastic to cover the two smaller openings and with pencil drew the outline of the opening. Using this I marked out the centre of these two openings and worked from there to mark out the positioning of the two panel mount DB15 sockets. I then used a small drill and file to cut out the holes for the connectors and then mounted them.

The 290x95mm had two holes drilled into it to fit M5 screws with large washers both sides which would secure it into place so as to cover the large opening:

Note: I had originally intended to use the gap from the housing damage to house the female USB pass-through connector as it was almost already the perfect width but later found that I could not close the joystick casing when it was internally connected even with a 90° USB cable so please excuse that it may appear in that location in some upcoming images.

PART 3: WIRING:

For arcade control panel wiring you should use 22AWG stranded wire and I highly recommend using type “UL-1007” wire which the Chinese ebay seller lovebead1980 has for sale.

IMPORTANT NOTE:
Always over estimate the length of wire you are using when cutting as you can always cut off more but you can NOT add more back and you also need to allow enough sway for the opening and closing of the casing.

I soldered wires to all connections to the solder lugs on both my DB15 panel mount connectors and tested them for continuity as once the panels are glued into place you can not easily go back to redo the wiring. I colour coded mine with Black for Ground (Pin 1), Red for +5 Volt (pin 8), White (pin 9) for No Connection and Blue for everything else:

To allow for the ease of button re-configuration I decided I would buy two DB15 Female Screw Terminal Breakout PCB. When they arrived I de-soldered the DB15 connector and pin for pin directly soldered one to each panel mounted female DB15 connector. Once again I tested their continuity before proceeding.

I added two PCB feet to both the DB15 Female Screw Terminal Breakout PCB and four PCB feet to my I-PAC 2 Keyboard encoder. Then I used Gorilla Glue to glue them into position and the now completed panels were also glued into place:

Using 2.8mm Red Crimp Spade Terminals and Black 22AWG wire I daisy chained one connection on every button for Ground (it doesn’t matter which one you use).

I kept my Ground loops for both players separate as I am linking their Grounds together through the I-PAC 2 keyboard encoder for convenience:

While a lot of people online recommend using a Ratchet Crimping Tool, for this a simple and cheap Hand Crimping Tool obtained from ebay or your local hardware store is more than sufficient.

Don’t waste your money!

I then also crimped spade terminals onto colour coded 22AWG wire (this is to make life easier but is not required) for the buttons second connection.

My colour coding for the Sanwa Buttons:

Button 1 - Blue
Button 2 - Purple
Button 3 - Red
Button 4 - Pink
Button 5 - Orange
Button 6 - Yellow
Start - White
Ground - Black

While my wiring is slightly different at the moment as I am currently using a RetroelectroniK Supergun, I would advise you use the diagram below for wiring up the DB15 connector:

DB15

Using cable ties and tie mounts I hooked everything up to all the screw mounts. I then started to trim the wires down to more appropriate lengths and bunched together cables as appropriate.

The wiring to the Joystick Directions and Start Buttons will never need changing so could be connected to either the keyboard encoder or DB15 breakout PCB in any order as long as both were connected.

However to allow for easy button reconfiguration when connected to arcade hardware all 6 buttons were first connected to the keyboard encoder before being looped to the DB15 breakout PCB with slightly longer than required 22AWG wire. This was to ensure that any button on the arcade stick could be remapped to any input from the DB15 connector without having to replace the wire.

Any screw terminal that required two wires to be connected to it had the ends of the wires twisted together first to ensure a secure connection:

To be continued

2 Likes

THIS IS BEING UPDATED AS I GO THROUGH MY WRITE UP:

Break Down of Costs so far: (Including VAT)

  • Control Panel: £25
  • Astro City Reproduction Decal: £17
  • Sanwa JLF-TP-8YT Ball Top Joystick x2: £40.78
  • Sanwa OBSN-30 Screw In Arcade Button x12: £26.64
  • Sanwa OBSN-24 Screw In Arcade Button x2: £4.20
  • Joystick Carriage Bolts And Nuts x8 £2.88
  • HOT1501 & HOT1506 Blast City UPPER & UNDER Control Housing: £58.79
  • Screws & Washers (Various): £6.93
  • I-PAC 2 FS32 Keyboard Encoder: £29.99
  • USB 2.0A Female to Female Panel Mount Socket: £1.08
  • DB15 Female Breakout PCB x2: £2.68
  • 22AWG Stranded wire 10m @£1.39 x7 colours: £9.73
  • 2.8mm Red Crimp Spade Terminal Electrical Connectors x28: £0.54
  • DB15 Connector Female Socket x2: £1.99
  • 3mm A4 White Perspex Acrylic Sheet Plastic: £2.54
  • Cable Ties: £1.00
  • Tie Mounts: £1.75

Total Cost: £233.52

Useful Links:
Blast City Service Manual

2 Likes

Looks cool. And yeah, it’s amazing how dirty some of the stuff that comes from Yaton can be. It’s almost their calling card.

This is a great project as per usual @Suteneko, great work! I’m looking forward to the next updates!

1 Like

Love seeing old hardware being repaired/restored! This looks amazing and I love the links and cost breakdown, makes it so much easier to perhaps start a project like this. Did you have to purchase any of the various liquids especially for this project?

One more question, is the artwork covered by a plexi panel?

2 Likes

Yaton’s been around forever, too. I imagine this big warehouse full of rotting arcade stuff just waiting for the right person to come along and buy it.

1 Like

Wow, incredible job! Looks perfect.

None of the liquids were specifically bought for this project and were either left overs from other projects or just some regular household cleaning items I keep on hand. I do intend to do a break down of their costs separately and list everything used at the end.

It is covered by a glass cover and I have edited in the restoration of this part into my first post now!

1 Like

I had no idea the instruction panels on these was glass, this thing must weigh a ton!

Is the control panel also covered in glass or is it just the metal plate with the reproduction vinyl on top?

I really want to follow this project and make one! Does the £58.79 price for the housing include shipping and import tax? I’m in the UK also so am wondering about that.

This thing looks awesome, I love that this is from a real arcade, the coin slot on the panel is everything.

It is just the metal plate covered with the reproduction vinyl on top.

You might struggle to find both the Upper and Under housing for the same price. I also did not end up paying any Import tax on it as Yaton declared it as a gift and at a low value. Ebay does not show shipping costs for items purchased after a certain period of time and I can not recall what shipping I paid for it, though it wasn’t that expensive.

The Uppers themselves are quite easy to obtain, but those Unders for some reason seem to be quite rare and prices can be all over the place. I think I got lucky to get them together with all the fixtures (Videotronics UK has some NOS fixtures if you need them) and got my offer accepted. Also have to remember I bought mine almost a year ago now so pricing may have changed.

Best advise I can give is to keep checking Ebay and Yahoo Auctions for complete housings and/or just the Under. You could also look into different control panels as I believe you can do similar with MVS arcade control panels as well and you might be even able to find one that already has joysticks and buttons installed and wired up though you will invariably want to replace those.

Regardless I think you are looking at between £200 minimum to around £350GBP total to get something like this built up and restored so it is not exactly cheap.

2 Likes

Appreciate all the info! Maybe I’ll install the control panel in a custom mdf board short term until I can track down all the housing.

Great work, looking forward to part 3.

1 Like

Edited in PART 3: Wiring now.

Still have a few more things to add yet but again ran out of time with the write up today.
Let me know if there is anything that seems unclear or if you have any questions to ask!

That was pretty much my original intention as well, but this project got a bit out of hand! :wink:

This look as neat and clean on the inside as the outside, great job on that. I love that you glued those pcb feet onto the base!

I wonder why someone made such a horrible cut to the base.

Will you be attaching this to a cab of sorts or just be using it on a table?